Tag Archive | Cheapskate Tuesday

Cheapskate Tuesday 15: headed for the water!

IMG_9773

Inspired by this great post by C.L Goforth, a.k.a. the Dragonfly Woman, I decided to get my feet wet with aquatic insect photography. This is a field which I have almost completely ignored, probably because I thought it was too challenging. But really, despite a few technical challenges, it can’t be all that different from other types of shooting, and there is such a wealth of fascinating and beautiful subjects to photograph!

So far, I have just acquired a tank (a small, cheap betta tank, c. 20 bucks) and I have yet to add  the recommended spacer to restrict the movements of the subjects. I have situated the flashes as below, added some diffuser material (same stuff as in the Cheapskate Diffusers) and shot away at what was available, in this case the larvae of Culiseta incidens, a common early-season mosquito here on the West Coast (in fact they overwinter as mated adults).

I will keep this blog updated with further refinements and experiments as I delve into aquatic insect photography. To all my fellow insect photographers: why not join me as this insect season really begins?

IMG_9788

IMG_9756

So far the results look decent on tricky small subjects. I have not edited out any of the bubbles and other flaws, and I may have pushed the contrast up too much, but I am hopeful and optimistic! I especially like seeing details of the gut and musculature through the cuticle.

IMG_9746

This frame shows one reason to get your lens axis exactly perpendicular to the glass of the aquarium: distortion!

IMG_9768

I am fairly pleased with this frame, as it shows decent depth of field and good sharpness on the setae (hairs).

IMG_9779

This larva was moving toward the camera with the feeding movements of its mouth brushes.

Here is what Culiseta incidens looks like as an adult.

Cheapskate Tuesday 14: Fenix E-05: a handy little flashlight!

cc

Dwarf Caimans (Paleosuchus spp.) and other crocodilians can be found with headlamps, but if you want to use your handheld flashlight, hold it close to the visual axis of your eyes in order to better perceive the eyeshine. Photo by Tanya Jones.

Headlamps are very useful for nighttime nature photography as well as tropical fieldwork. For extended trips, or just to get better performance, I use rechargeable NiMH batteries. These AAA cells come in packs of four, but most headlamps only require three. What to do with the fourth?

Well, it is always a good idea to have a spare light, and the little Fenix E-05 is a great little light the requires but a single AAA battery to produce up to 27 lumens (that is a lot!). Problem solved!

They are compact, waterproof and f-ing bright as heck! So bright, you don’t wanna point them at your eyes bright. I have used them in fieldwork as well as in some studio lighting of Black Widow behaviour (but I can’t show you as it is not yet published!).

IMG_7394

These little guys cost about 20 bucks and have served in nighttime focus  illumination of several rainforest creatures. When in the field or out of it, Catherine and I clip these to our bags for a handy tool for our illumination needs. There are several colours to choose from, which is important for accessorizing (kinda?).  If you want to read up more on these inexpensive little lights, go to Ken Rockwell’s review here.

IMG_7403

Cheapskate Tuesday 13: Little progress on the Salticid Startler®, but here are some more bees!

IMG_6151
I have made little progress on the Salticid Startler®, owing to other commitments, but I have purchased some nail polish for the chelicerae and paint for the bodies. I will update when I make more progress. In the meantime, have a look at Mike’s new 50 mm 1.8L lens! Some creative work with red pinstriping and he has got about 2 bucks more on the resale value. He also has a great conversation piece!
IMG_2512

And as an update to the Weekend Expedition post, here is some more video and pictures of the large Solitary Bee (I haven’t figures out if they are Colletes or Andrena) colony.

IMG_5933b

IMG_6093b IMG_6096b IMG_5946b IMG_6014b

IMG_6140b

Beeflies were standing by to parasitize the nests.

Cheapskate Tuesday 11: go to FM forums!

IMG_2302

Since I have been covering quite a bit of macro-related stuff in Cheapskate Tuesday, I would like to direct your attention to the FM Forums Macro World, where the thread “Post Your Setup” is a great source of inspiration and advice. The commentary and feedback you can get when you post your work on the Macro World thread itself can be very useful, and I would urge anyone interested in macro photography to give it a try.  You can specify when you post your work that you are soliciting feedback and criticism.

The other great thing about visiting a forum such as that is that you can encounter new photographers, and be inspired by their work.

aa

“How does my hair look?”

Cheapskate Tuesday 10: the Monster Macro Rig

sp5b

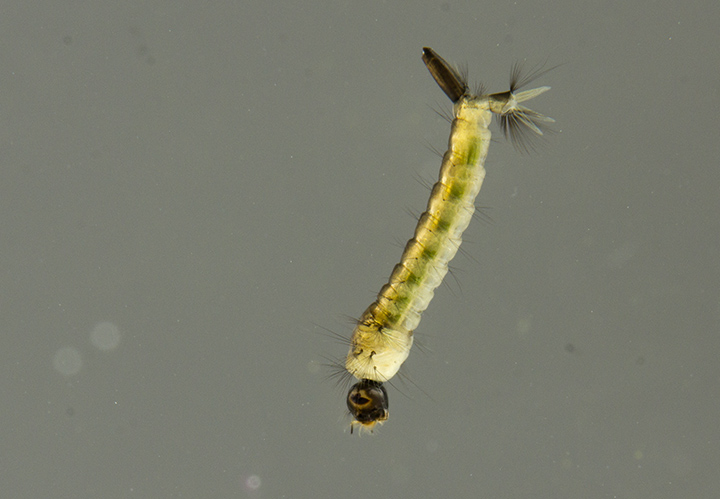
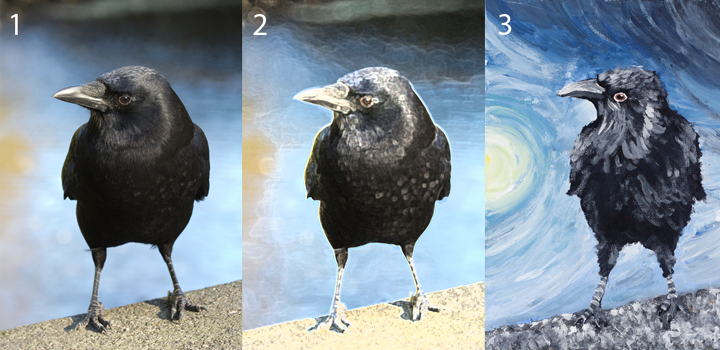
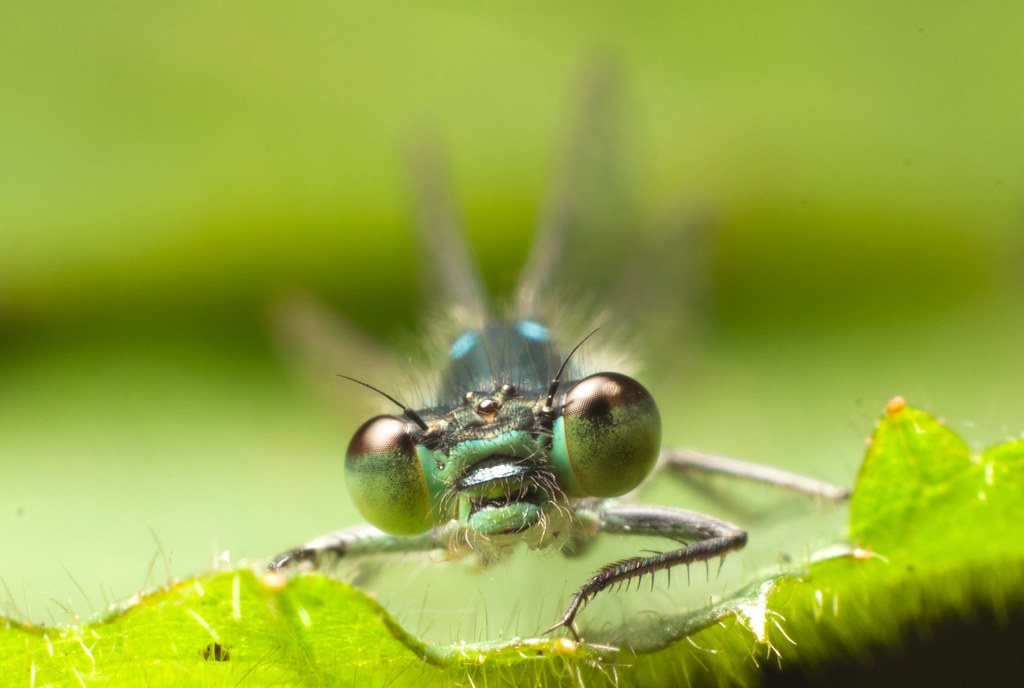
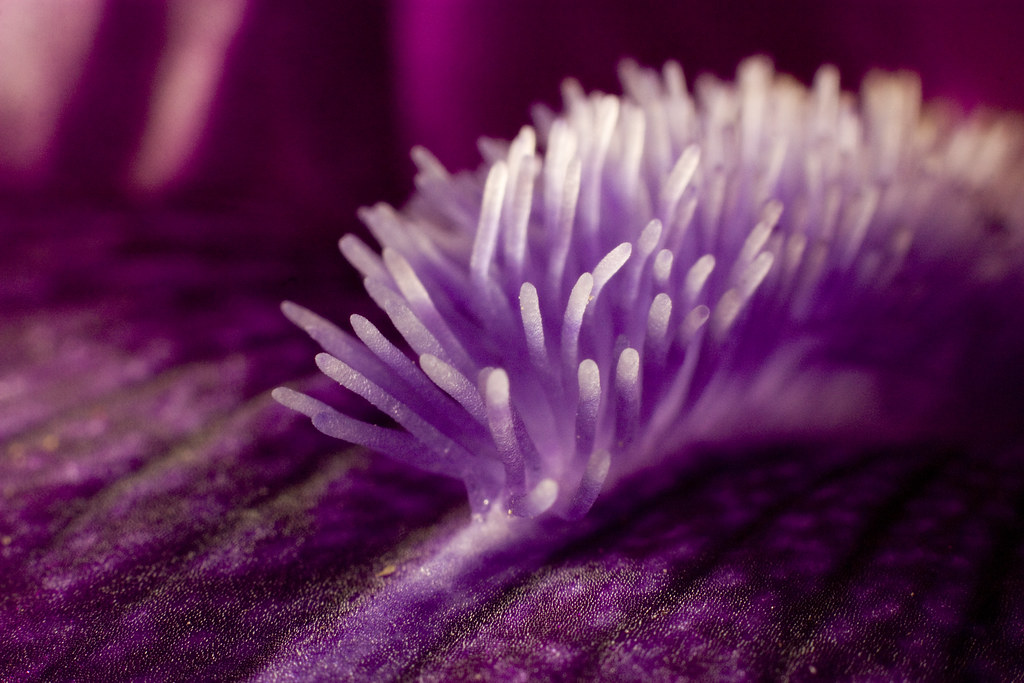
One of the great challenges of macrophotography using speedlights is the  phenomenon of falloff. Using a diffused speedlight near a small subject is in essence putting a powerful light right next to the subject. This sets up a major obstacle to a good exposure, however,  because the intensity of illumination from a light source declines  proportionally to the inverse of  the square of the distance  (the Inverse Square Law). As the distance from light to subject is so small relative to the distance from the light to the background, harsh falloff is expected to occur in the light from the key.   This is especially evident when your subject is perched on vegetation some distance above the ground.

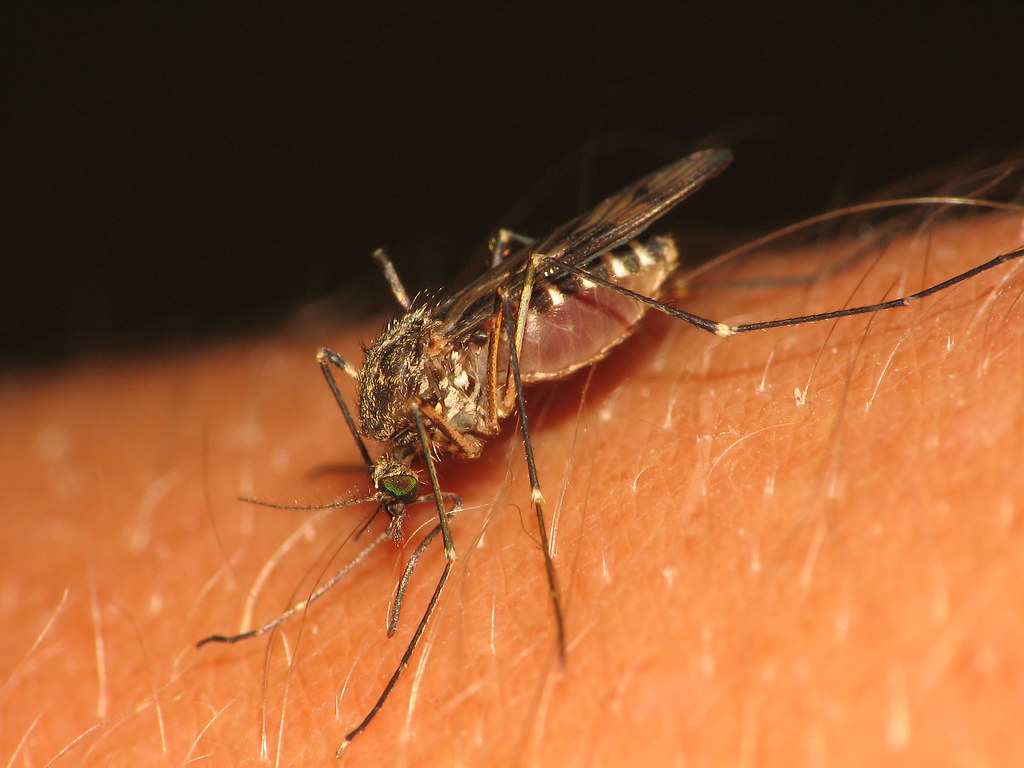
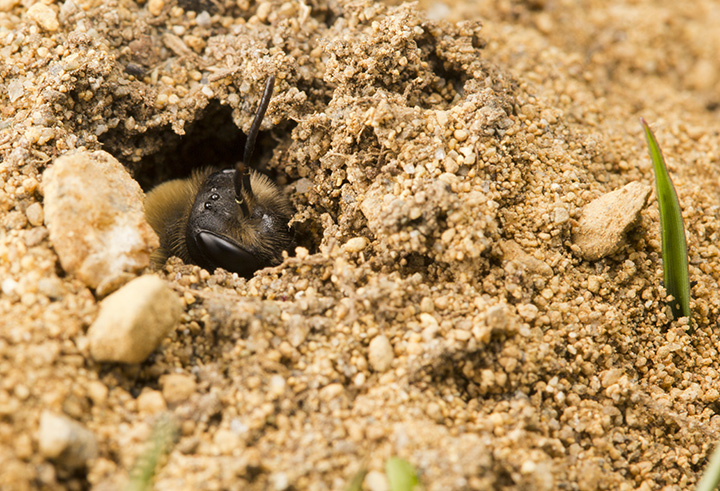
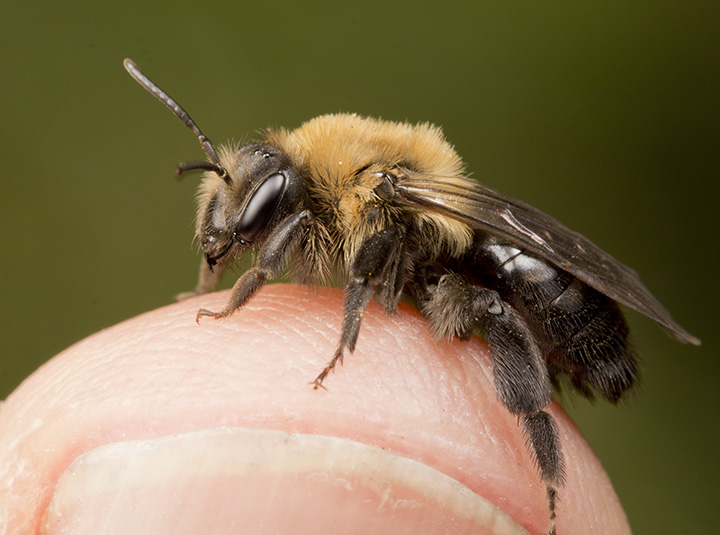
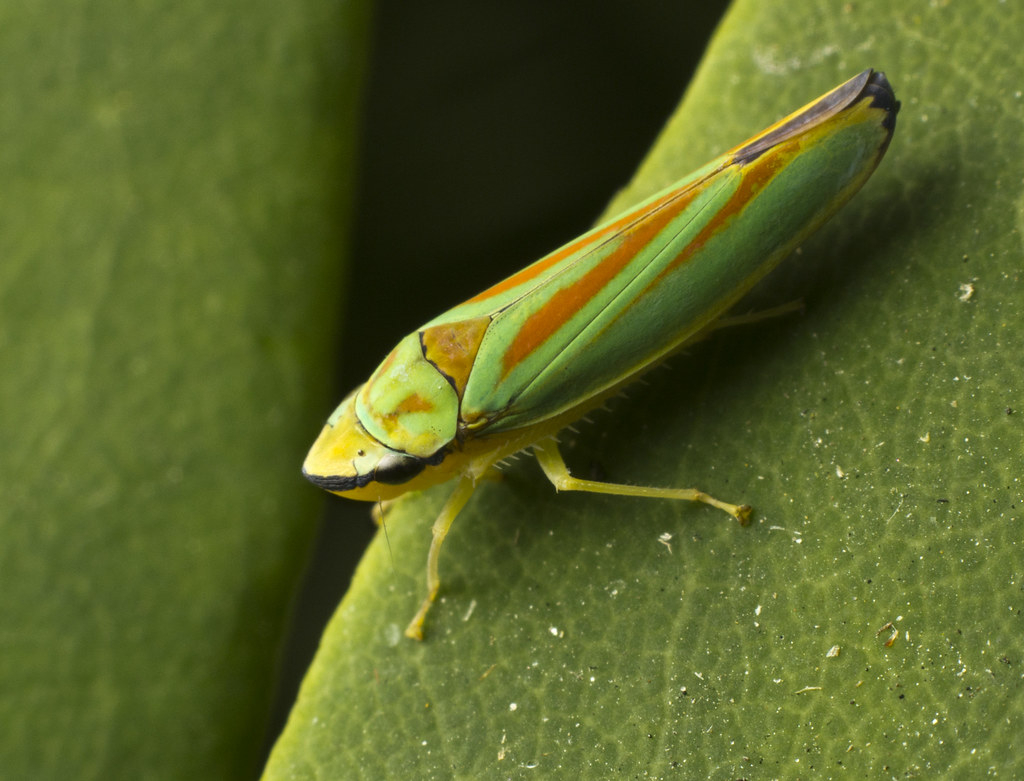
Compare the two frames above. In both cases, the main or key light on the subject comes from the same diffused YN-560 above and to the left of the subject.  In frame number 1, the falloff is so great that the background is essentially black, making it appear as if the subject was photographed at night. In frame 2, the background is illuminated by a second (bare) speedlight aimed so as to bypass the subject.  The way these lights are positioned is the subject of this week’s Cheapskate Tuesday.
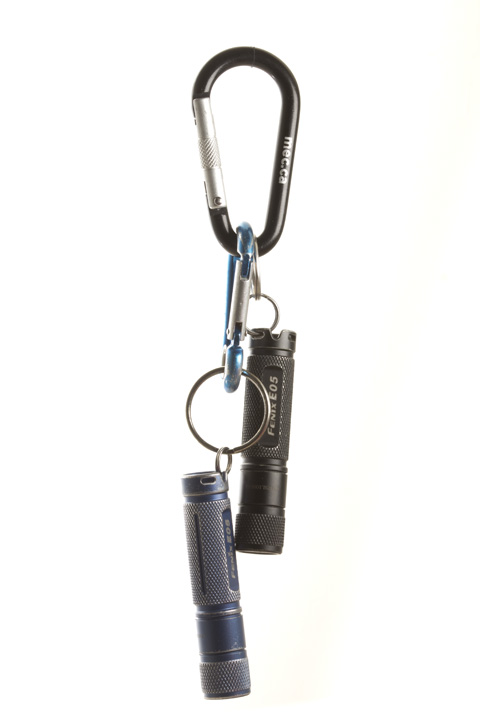
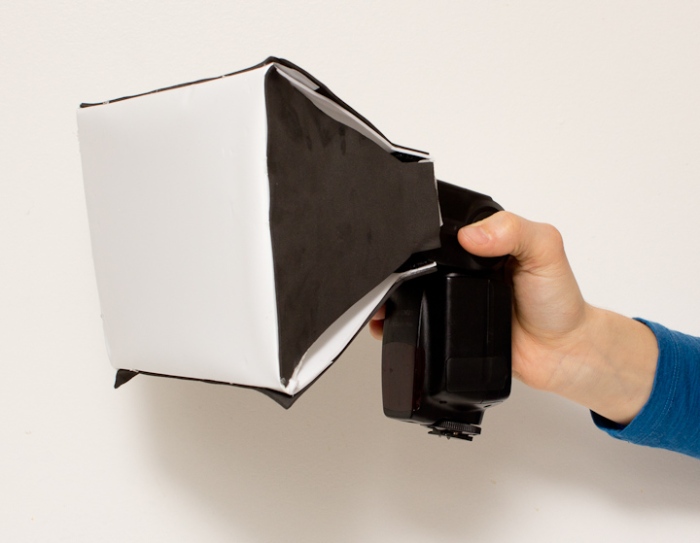
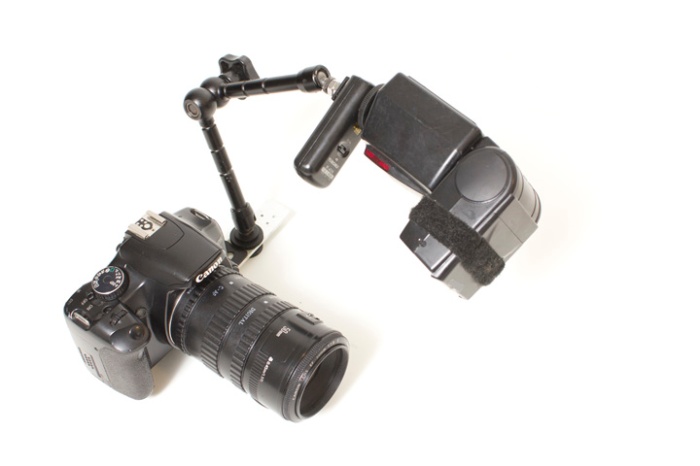
Behold! The “Monster Macro Rig

Untitled-2sm

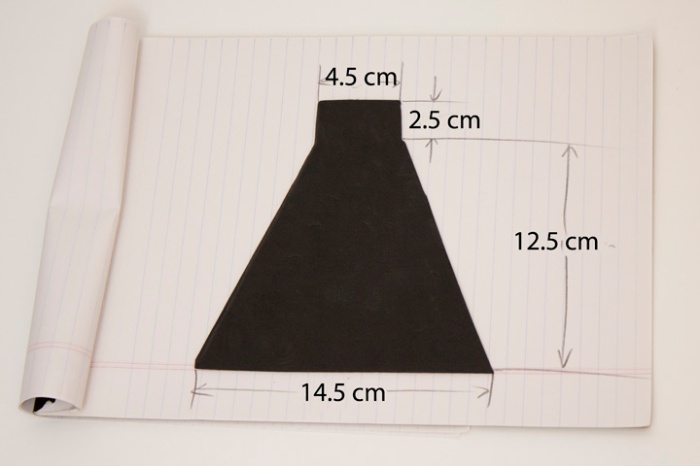
The construction of this beast is pretty self evident, the materials required are:

1) Arca Swiss type Rail, I used the DMP-200 from Sunway Photo. This is a pricey object for Cheapskate Tuesday, at c. 120 bucks.

2) 2 11″ friction arms, the ones you can find on EBay

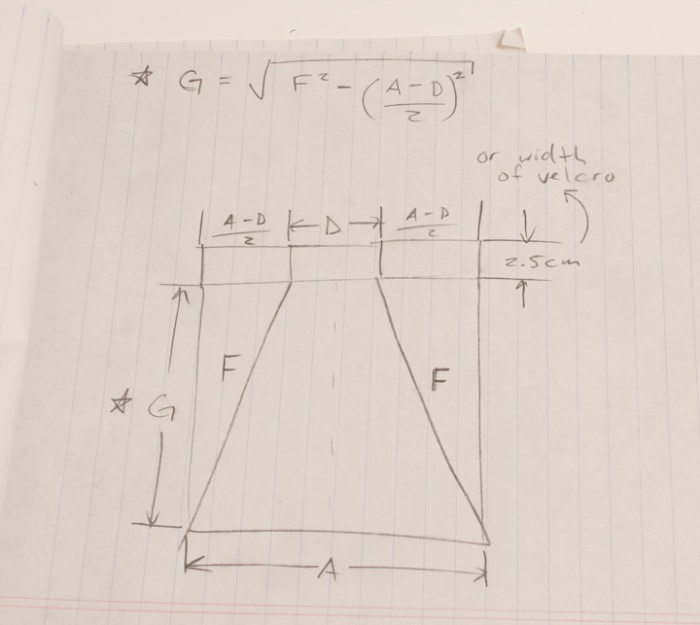
3) a small piece of aluminum stock

4) an extra Arca head and QR plate (c. 15 bucks if you shop around).

5) various bolts, nuts and lockwashers, speedlights and radiotriggers.

IMG_5850

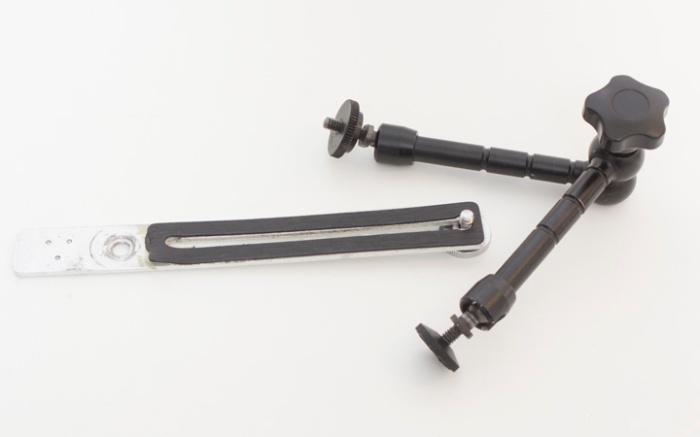
Here is what it looks like sans camera. It can be folded down into a pretty compact size.

IMG_5856

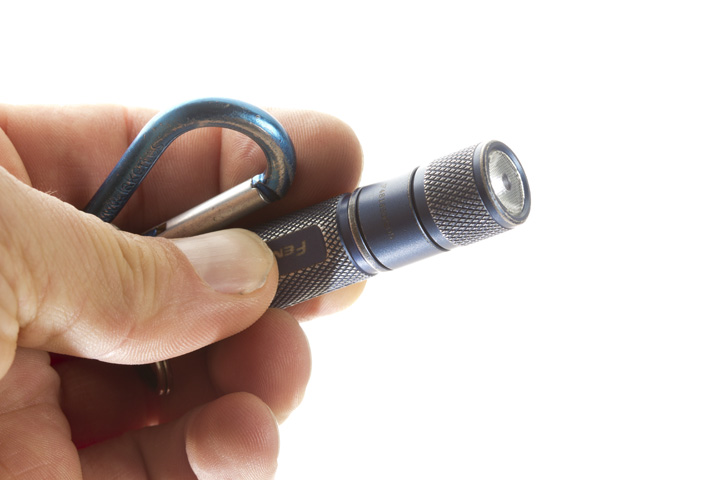
the Arca head is screwed into the tripod mount of the lens. This allows the camera to be moved back and forth along the rail relative to the lights, which is useful for taking multiple shots at different magnifications without changing the exposure.

IMG_5860

The key light is diffused and illuminates the subject, the background fill is aimed so as to miss the subject and illuminate the background.

IMG_5869

This is by no means the only way to construct such a beast, but the rail setup makes it convenient for changing the magnification quickly. A cheaper, lighter and easier alternative can be found here:

This setup takes some getting used to, but it is gratifying in how easy it is to make the images…

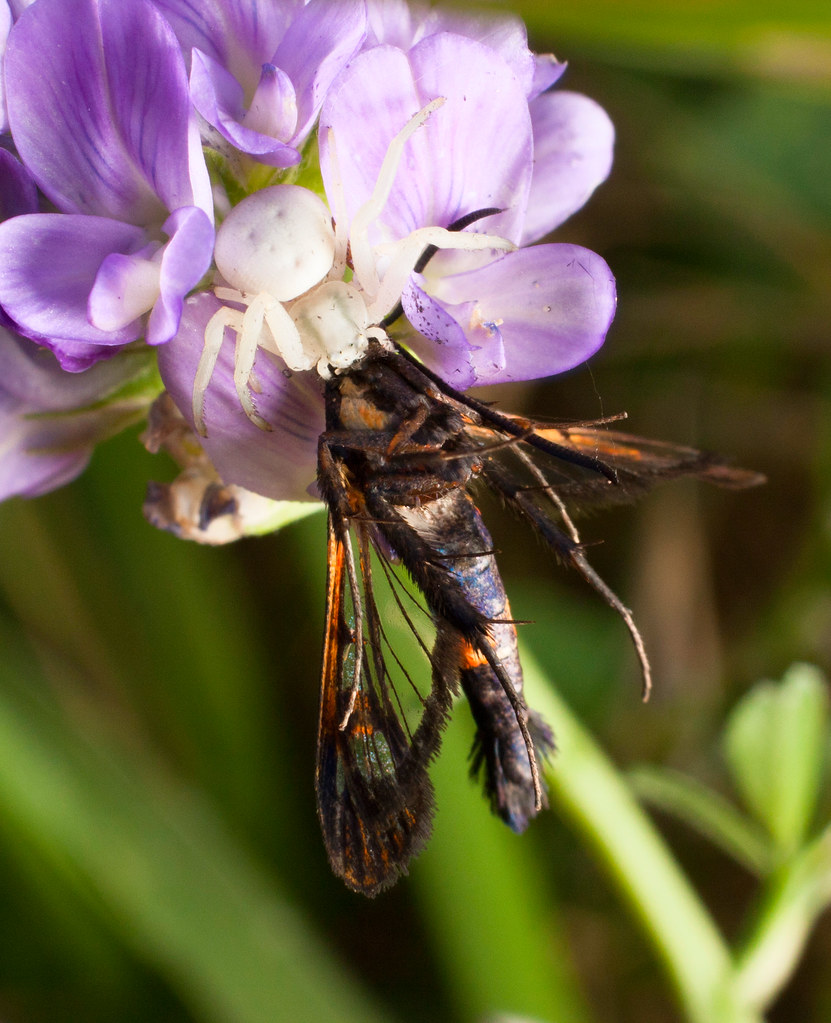
One of the difficult things to master is matching the background and foreground exposure. There is a certain sweet spot for subject to background distance that cannot be exceeded if the technique is to work.  For insect photography on low vegetation, it works well, provided there is some background to light up within a couple metres. Another thing to watch for is distracting background elements, such as dead grasses,twigs or other light colored items. 

IMG_2702

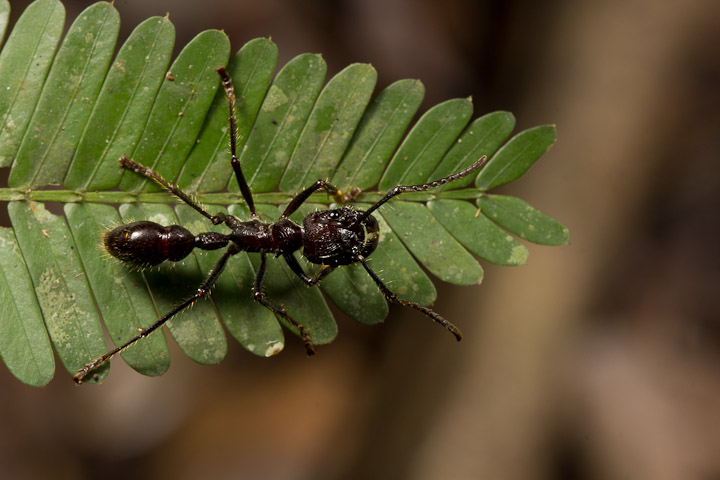
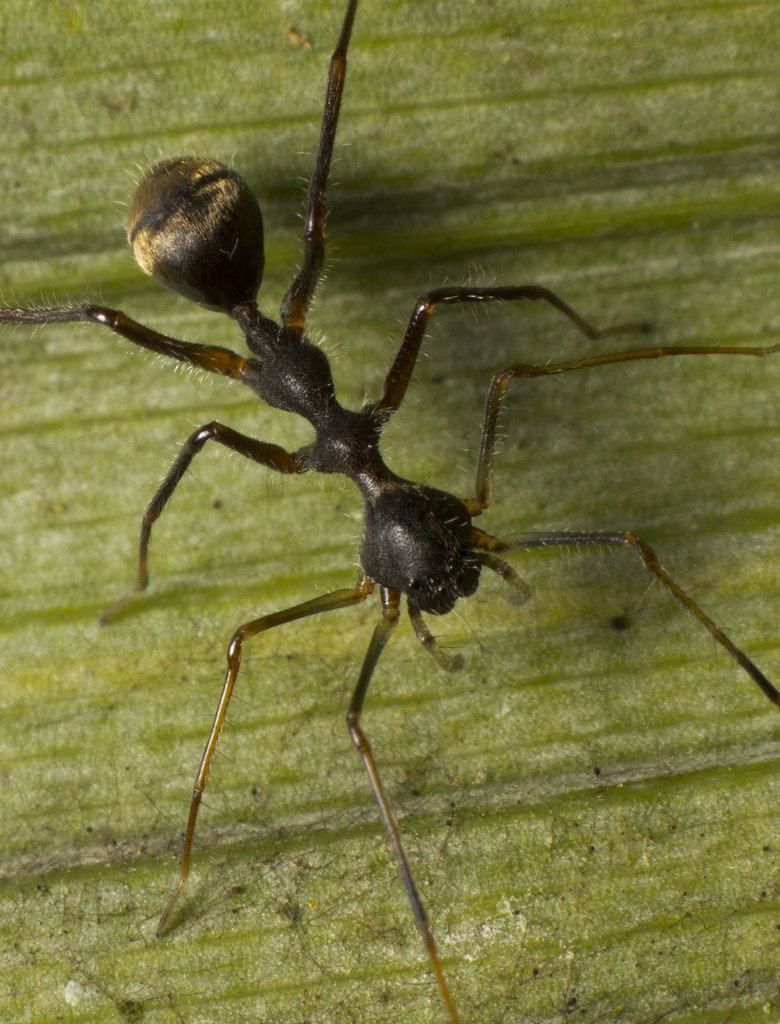
This shot of a Bullet Ant is an example of where the background might be considered distracting.

IMG_2703

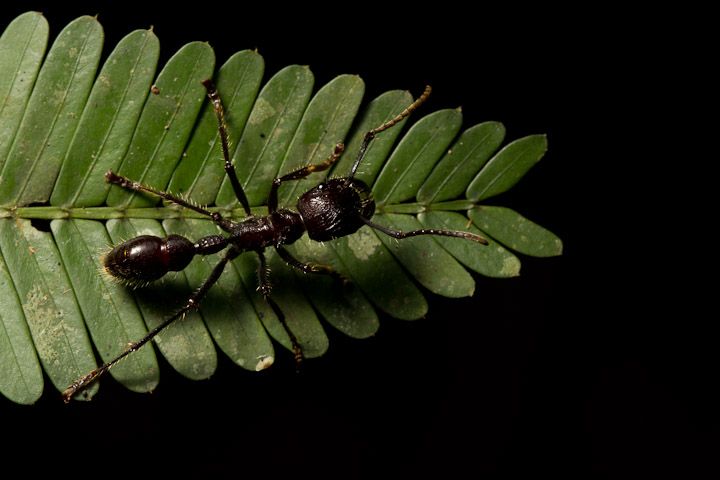
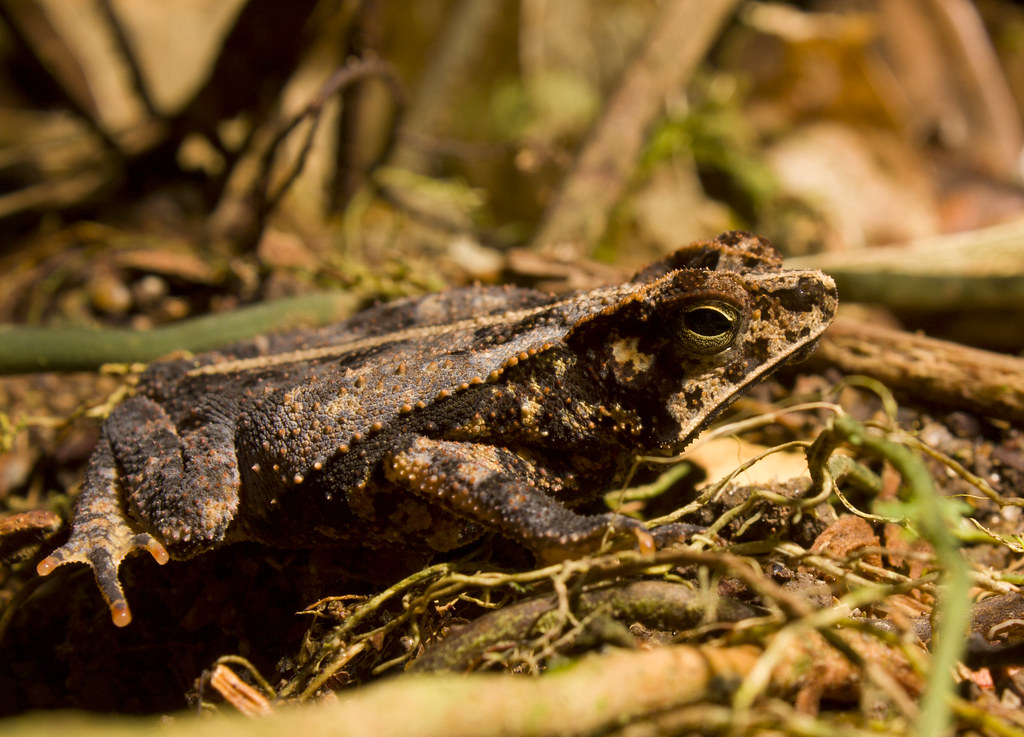
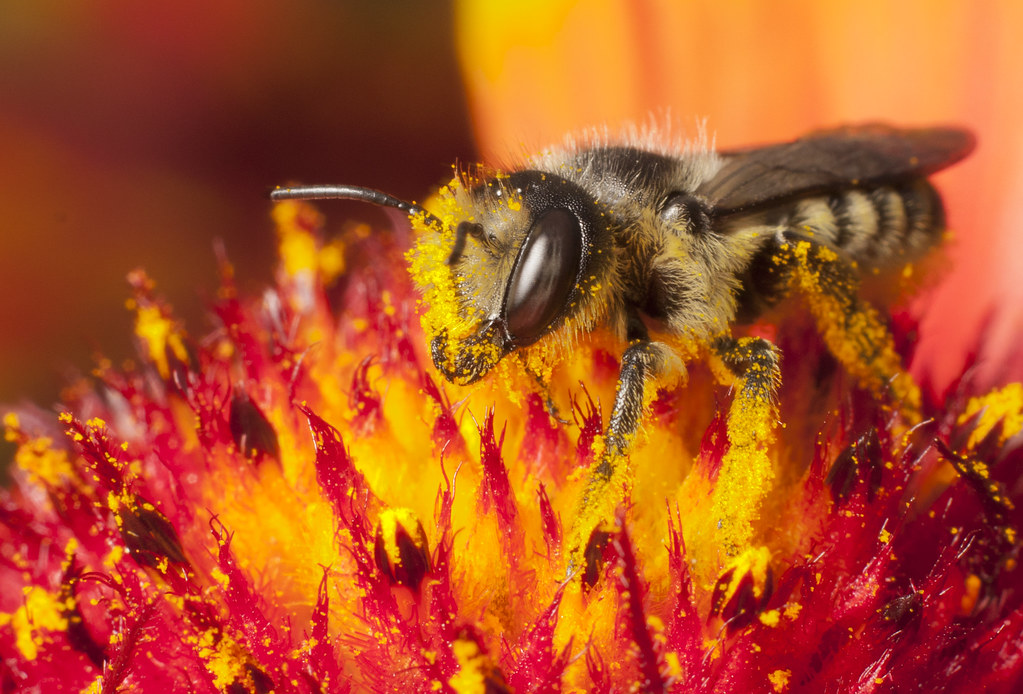
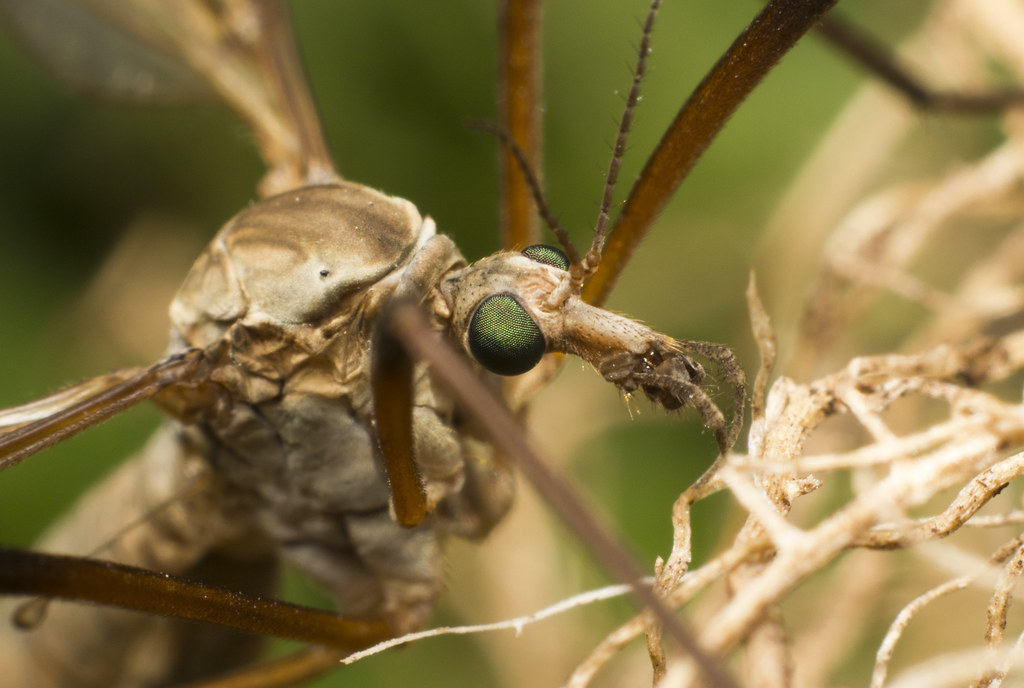
Here the background is not distracting but extreme falloff rears its ugly head.

Keeping such caveats in mind, it is a fun device to use and a practical way to balance subject and background illumination with a handheld rig. Of course, if the background is no appreciable distance from the subject, the second light can be used as fill.

IMG_2725

This tick in French Guiana was illuminated with the Monster Macro Rig

This same image of a Damsel Bug was used to illustrate the Cheapskate Diffuser Mark I, where I mentioned the subject was illuminated with the diffuser This was true, but was not the whole story. the background was illuminated with a second speedlight held in the Monster Macro Rig. .

The Monster Macro Rig is probably the priciest item for Cheapskate Tuesday yet, but considering all the components, including 2 Yongnuo or similar speedlights, it still comes in cheaper than a new Canon speedlight, and much cheaper than the MT-24 EX. For longer macro lenses, such as the 100 mm, I would argue this is the better lighting option.

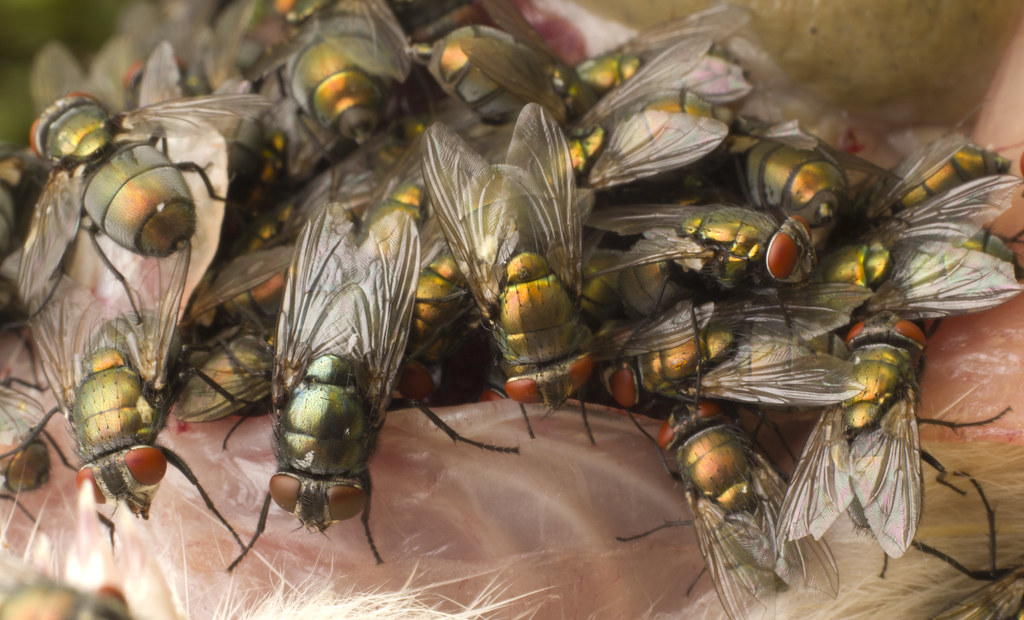
Sometimes the effect can be magical.

Cheapskate Tuesday 9: Black Foam flag/snoot

IMG_7852

Note: this post/idea is owed entirely to Neil van Niekerk, an extremely talented wedding and portrait photographer. It is, in fact, his famous “Black Foamie Thing“. Please do visit his site, as I do not have the talent to really do the subject justice! I merely present the idea, with a few examples, and send you on along to his blog, where you can feast your eyes on his excellent results.

The black foamie thing is  mainly with an on-camera speedlight, but it can also be taken off camera or used for other cold lights. It has several uses:

1) to flag something, that is, to block direct light from a light source spilling on a subject or a distracting background object.

2) to shape light. It can be used as a flag, or rolled into a “snoot” or used to direct bounce flash in one direction only.

3) for walk-around bounce flash use, it can be used to control spill so as not to annoy people (such as at social functions).

Below is one way to make it:

The material are some self-adhesive velcro and one sheet of black foamie material, the same stuff as used in the Cheapskate Diffuser Mark II:

IMG_7827

First, cut a piece of velcro to go along one long edge.  Stick it there.

IMG_7829

Cut four more smaller pieces, two hook and two loop.

Stick them in the middle of the shorter edge, on alternating sides. This will allow the foamie to form a tight snoot around the flash head.

IMG_7843 IMG_7834

IMG_7850

Done!

Here Catherine is modelling the flag in the “flag your subject position”. Her subject is a spider (appropriate!). Note how the direct flash does not fall on the subject, although the flash is on the camera.  Instead the subject gets a nice even illumination.

IMG_7864

Catherine modelling the “flag subject, light from the side (window light) position”. Note that she is a bit too close to the wall to get a nice large “window” light…Did I mention Vancouver is one of the most expensive cities to rent in?

IMG_7854

Catherine uses the black foamie thing in snoot configuration, showing the tight beam. This could be used off camera, perhaps as a rim light or hair light.

IMG_7858

Here are some shots demonstrating the effects of the flag, starting with “window light, camera right”

IMG_7880

Window light camera left:

IMG_7881

Flag the subject, illuminate from above (note how there is some specular highlight in her glasses from the low ceiling, though the lighting is flat left to right):

IMG_7884

Here is a composite of three  examples taken using two speeedlights with black foamie thing in snoot configuration, behind and to either side of each of these feathers in turn:

There are other ways to make and use these things, and even some commercial products which do the same thing. It can be a helpful tool to have around, and seeing as it costs 2 bucks, it is a good project for Cheapskate Tuesday.

Cheapskate Tuesday 8: giving your photos a “painted” look without Photoshop

ab123

Here are the results of three alternative photo processing paradigms.

1: the unaltered image.

2: the same image processed with Adobe Photoshop’s “Accented Edges” filter.

3:  the original photo processed by Catherine Scott, using just her hands, some paint, and a paintbrush.

Of the two altered images, I prefer number three, because it takes the crow in a more Impressionistic direction. Catherine points out that it doesn’t use expensive software, and took less time than our so-called “1 hour” photo printing place down the street. Your results may vary.

acrowcopy

Stay tuned tomorrow for a post on Treetrunk Spiders!

Cheapskate Tuesday 7: Cheapskate Flash Diffuser Mark II

IMG_5840

*NOTE! The instructions here are great for cutting out a pattern to fit your flash, but check out the Cheapskate Diffuser MKIII instructions for a better method of general construction


Adrian Thysse has just announced a macro tools workshop for you Albertans, and Alex Wild has just put up a post about diffusing an MT-24 EX, so the time is ripe for macro flash diffusion discussion. This week’s Cheapskate Tuesday is an overhaul of the Cheapskate Flash Diffuser, essentially transforming it into a small softbox. This update uses the same plastic diffuser material as well as craft “foamie” material.  A glue gun or other adhesive option is also required.

The two chief advantages to this updated device are: 1. the diffusion material stands off several more centimeters from the flash head, so the illumination of the diffuser is more even. 2. The new device is stiff and solid when mounted to your speedlight, so it won’t flop around. The disadvantages are the more complex build, larger folded size, and increased weight (48 vs. 12 g). Another disadvantage is that this is no longer universal, but must be made to fit the dimensions of a particular speedlight. Here I have illustrated a build that would work for a YongNuo 560, 565 or a Canon 580. The generalized schematics to adapt the design to any speedlight are found below. If possible, I will have some shots from the field taken with this soon.

Please follow along below for the essentials on how to construct the Cheapskate Diffuser Mark II. Just like an update to a Canon lens, this Mark II will run you three times the price. So budget around 3 dollars. Because being a PhD student wrecks my brain and hands, I had to rely on my local Master’s Student Catherine Scott to help me out with all the tough geometry, hand modelling and cutting! Pythagoras also helped immensely.

IMG_5798

This “foamie” craft material is the basis for the modification. You will need two black sheets and two white sheets.

IMG_5795

Using the same plastic diffusion material as in the Mk I, mark off 4 cm from each side.

IMG_5799

For the wide sides, cut out the pictured shapes in both the white and black foamie material.

IMG_5803

Same with the narrow sides. Make two in black and two in white.

IMG_5807

8 foamie pieces of four kinds and a marked plastic sheet.

IMG_5811

make creases along the lines previously drawn

IMG_5816

lay down a bead of hot glue along the creased 4 cm

IMG_5818

glue down the black pieces on the corresponding sides. Black goes on the “outside”. Then glue the white pieces on the inside, sandwiching the plastic in between.

IMG_5821

ready for cutting out

IMG_5823

cut out the corners

IMG_5830

cut out velcro to size

IMG_5836

ready to rock

IMG_5843

mounted to the YN 560.

IMG_5852

these schematics are for designing custom diffusers for differently sized diffusion material or a different speedlight. Here is how to measure a flash head and mark off the diffuser material.

IMG_5848

schematic for the larger pieces. Note that B and C are the dimensions from the previous diagram, and that F must be measured.

IMG_5854

schematic for the smaller pieces. First calculate G, and make sure F is the same as measured in the previous diagram.


UPDATE!!!!!!!!!!!!!!!!!!!!!!!!!!

found a Camponotus alate in the hallway at school today, so I had an opportunity to test out the CFDMkII

IMG_5891 IMG_5897

Cheapskate Tuesday 6: A simple flash bracket

So far on Cheapskate Tuesday I have desscribed two different ways of getting close to a subject, with macro diopters, and the use of extension tubes and cheap 50 mm lenses. I have also covered flash diffusion and radio triggers. There is one element missing for a cheapskate macro rig, and that is some kind of bracket to mount the diffused flash to the camera. This is necessary  because although it is sometime practical to hold a speedlight in one hand while shooting, it is often nice to be able to hold and fire everything with one hand free to hold back vegetation, or steady the subject.

Below is one easy option to accomplish this.
IMG_5319

On the left is a simple aluminum flash bracket (or a piece of one anyway). They can be found on ebay, if you search for “flat flash bracket”. They may run anywhere between 3 and 10 dollars. A better option would be to visit a used camera store, as they probably have oodles of these sitting in a dusty box somewhere.   The second item is an 11″ variable friction arm, also available via ebay. This device allows you to connect any two objects that both have a female 1/4″ thread. The arm allows you to flex the central joint along one axis, and a great range of movement on the ends via a ball and socket type linkage. When the main knob is tightened, the whole assembly locks rigid.  These two inexpensive items can be put together using a 1/4″ nut, some washers and a lock washer.

IMG_5308

The arm can be used to cantilever the flash (with triggers or ttl cable, and diffused!) out over or beside the subject.

IMG_5313

The flash can be oriented to either side, or the entire assembly can be rotated so the friction arm is to the left or right.

IMG_5315

The bracket can be used as a standard flash bracket as well, and can bring the flash nicely off-axis for paparazzo-style shooting with wider lenses.

See below some examples where I have used this type of bracket. I have found it is a simple, cheap and lightweight general purpose bracket for many shooting situations. .

This French Guianan toad was illuminated from above using the friction-arm mounted flash.

This setup works especially well working very close, as in this portrait of a damselfly.

This ant-mimicking spider was also amenable to use of this bracket. Because the subject is illuminated from such a close source, falloff is a problem. In an upcoming Cheapskate Tuesday, I will share how I get around this problem.

Cheapskate Tuesday 5: Extension Tubes

Rebel with extension tubes

One of the cheapest and highest-quality ways of getting into closeup and macro photography with a DSLR is to use your nifty fifty on extension tubes. Extension tubes are a time-honoured way of decreasing the minimum focusing distance of any lens by moving it further from the image plane. The magnification you can achieve depends on the focal length of the lens and the amount of extension.

Perhaps the best illustration is to show a familiar object at three different focal distances with different combinations of tubes.

Here is what the 50 mm can do at its closest focusing distance on a cropped-frame camera:

IMG_4874

with just 12 mm of extension, here is the same subject:

IMG_4875

And with all 65 mm of extension tubes added, we can get really close:

50 mm with 65 mm extension tubes

Clearly, there is a great difference in close focusing ability with the tubes mounted. Also, I used an American penny as we just got rid of ours.

When you buy extension tubes, they often come in a set of three. mine had 13, 21, and 31 mm tubes, for a combined total of 65 mm.

IMG_4860

As you can see in the photo above, the tubes have contacts to command the lens’ focus and aperture from the camera. While these that I bought some years ago are often the cheapest of the products available (about 50 bucks a set), I recommend buying the more expensive Kenko branded ones (maybe 170 if you shop around?). My old tubes are mostly plastic, and the mount pieces are starting to wear and break. Kenko tubes have metal mounts and thus should last much longer. Sometimes being a cheapskate doesn’t pay off! That being said, if all you will mount will be the 50, the plastic tubes should last a good long time. With heavier lenses, there is bound to be more strain on the mounts.

With 65 mm of extension on a 50 mm lens, we can achieve slightly better than 1:1 magnification. This means that we can fill the frame left to right with a subject measuring 22 mm on a crop frame camera. This is pretty darn good for most insect work.

Where extension tubes get difficult is that to achieve different magnifications, one has to keep swapping them out and re-combining them. While all this fiddling is going on, your subject may be some distance away! Also, while the tubes are mounted, you have only a narrow Goldilocks zone of focus, and you cannot focus to infinity. If you were crouched down shooting a butterfly and Bigfoot walked by, you might miss the shot, while your buddy with the compact camera and the quick-dismounting Raynox DCR 250 would nail it!

Nonetheless, this is a great method for getting into macro and closeup photography.

So what kind of real-world results can be achieved?

This megachilid bee, photographed at Iona Beach, is brought in very close with the 50 mm on 34 mm of extension tubes.

A group of Lucilia sericata and a lone Phormia regina feed on the abdominal cavity of a dead rat. This shot used the 50 mm on just 13 mm of extension.

This detail of an Iris almost makes it appear to be a sea creature…Thanks, extension tubes!

To get this Rhododendron Leafhopper (Graphocephala fennahi)to fill the frame, all 66 mm of tubes were used.

Provided your subject is still, getting in close is not a problem.

The modest 21 mm of extension brought this life and death drama of the crab spider and the Apple Clearwing into focus.

Extension tubes can also be used with shorter lenses, but get much past 35 mm and the working distance is going to be very tight and possibly unworkable. With longer lenses, the magnification gains are more modest, but sometimes the shortened working distance can be useful. I also get nice results with the 300 mm f4 and tubes, but I will wait til spring has sprung and I shoot some more material before I post about that.

Anyway, I hope that I have been a good advocate for the use of tubes and cheap 50s to get in close. If you cannot afford a macro lens, but would like to make some nice closeups, this will get you started and keep you happy for a good long while.