Archive | February 2013

Rainforest video trapping!

Music: DJBrownBum “like a jungle”

In lieu of a more substantive post this week, I must resort to some footage of a Red Acouchi (Myoprocta exilis) coming to some Astrocaryum seeds. This I took in March of 2011 while testing out a DVR which I was going to use on the caracaras. Having this equipment on hand during the our field seasons was a cool opportunity to get some footage of interesting animals (as well as providing large portions of our data). In future posts I will put up some more of these jungle camera-trapping clips, as I think they can be fun and informative.

Cheapskate Tuesday 6: A simple flash bracket

So far on Cheapskate Tuesday I have desscribed two different ways of getting close to a subject, with macro diopters, and the use of extension tubes and cheap 50 mm lenses. I have also covered flash diffusion and radio triggers. There is one element missing for a cheapskate macro rig, and that is some kind of bracket to mount the diffused flash to the camera. This is necessary  because although it is sometime practical to hold a speedlight in one hand while shooting, it is often nice to be able to hold and fire everything with one hand free to hold back vegetation, or steady the subject.

Below is one easy option to accomplish this.
IMG_5319

On the left is a simple aluminum flash bracket (or a piece of one anyway). They can be found on ebay, if you search for “flat flash bracket”. They may run anywhere between 3 and 10 dollars. A better option would be to visit a used camera store, as they probably have oodles of these sitting in a dusty box somewhere.   The second item is an 11″ variable friction arm, also available via ebay. This device allows you to connect any two objects that both have a female 1/4″ thread. The arm allows you to flex the central joint along one axis, and a great range of movement on the ends via a ball and socket type linkage. When the main knob is tightened, the whole assembly locks rigid.  These two inexpensive items can be put together using a 1/4″ nut, some washers and a lock washer.

IMG_5308

The arm can be used to cantilever the flash (with triggers or ttl cable, and diffused!) out over or beside the subject.

IMG_5313

The flash can be oriented to either side, or the entire assembly can be rotated so the friction arm is to the left or right.

IMG_5315

The bracket can be used as a standard flash bracket as well, and can bring the flash nicely off-axis for paparazzo-style shooting with wider lenses.

See below some examples where I have used this type of bracket. I have found it is a simple, cheap and lightweight general purpose bracket for many shooting situations. .

This French Guianan toad was illuminated from above using the friction-arm mounted flash.

This setup works especially well working very close, as in this portrait of a damselfly.

This ant-mimicking spider was also amenable to use of this bracket. Because the subject is illuminated from such a close source, falloff is a problem. In an upcoming Cheapskate Tuesday, I will share how I get around this problem.

results of the Weekend Expedition to Comox

IMG_5093

As I suspected might be the case, this Weekend Expedition was more of a working holiday, as we went over to help Catherine’s parents move. The ferry rides  provided the majority of the good photo opportunities, but this is not a bad thing! A trip from the mainland to Vancouver Island provides a lot of photographic potential. Check out the results below to see what I mean.

IMG_5107

Regular ferry service between Vancouver and Vancouver Island principally services two cities: Victoria and Nanaimo (home of the Nanaimo Bar). We took the trip from Vancouver to Nanaimo, from which we got a ride  to Comox (thanks Sidnee!).

IMG_4992

The mist-enshrouded evergreen hills of BC. I used to fantasize about living here when I was a boy, imagining all the amazing animals in this relatively unspoiled province.

IMG_5004

Winter light on the seascape can do some odd things.


IMG_5032

One of my favorite things to do on the ferry decks is shoot gulls. It is one of the best opportunities to practice in-flight shots from all angles.

IMG_5112

On the outbound trip, there was even some blue sky. The gull looks surprised too.

IMG_5128

Saturday evening we took in some local culture. In Cumberland, there was a Taiwanese Lantern Festival.

IMG_5158

These large lanterns made for an interesting backdrop. Bounced flash off the ceiling allowed some detail to come out in Catherine and Julia.

IMG_5133

Shooting in the dark!  The ambient lighting is interesting at least.

The lantern festival culminated in a launch of aerial lanterns. I sewed up some stills into a movie to give a sense of what that looked like.

IMG_5120

This was the view on Saturday morning. On Sunday morning, the wind was raging, and dozens of eagles flew right by the window. It was too dark for photography however.

IMG_5235

The return ride was a little more choppy, but the seas are quite pretty in a grim and cold sort of way.

IMG_5261

Vancouver from the north with 18 mm (check out the boring composition…how not to use a wide lens!). This shows the full extent of downtown to UBC.

IMG_5239

Vancouver as seen from the North with a 300 mm lens.

IMG_5257

This would be the faster way to go!

IMG_5278

Vancouver is crowded, but this looks a bit isolated even for me!

Weekend Expedition Plans: A Comox Valley Mystery Tour

IMG_1398

Wet Eagle 1

This weekend I have no fixed expedition plans… Tomorrow Catherine and I head out to Comox on Vancouver Island to help her parents move, so it could be that the only photo ops come from the ferry ride. That being said, last time I was at the old homestead, there were two wet eagles perched about 20 feet off the balcony, so that was something!

So the details of the expedition are sketchy and mysterious as of now, but sometimes these turn out the best…Stay tuned for the results!

IMG_1434

Wet Eagle 2

Trumpeter Swans are another Comox Valley wintertime treat.

High speed Fly Takeoff

We had a representative of High Speed imaging Inc. in the lab today to demonstrate some high speed cameras…So what did we record? Some blowflies of course!

Check out how these awesome flies take off:

We have used high speed cameras before, but this one was pretty impressive. This video was recorded at 4000 frames per second, and is slowed down to 30, so it is about 133 times slower than real life. No wonder they are so hard to catch!

Cheapskate Tuesday 5: Extension Tubes

Rebel with extension tubes

One of the cheapest and highest-quality ways of getting into closeup and macro photography with a DSLR is to use your nifty fifty on extension tubes. Extension tubes are a time-honoured way of decreasing the minimum focusing distance of any lens by moving it further from the image plane. The magnification you can achieve depends on the focal length of the lens and the amount of extension.

Perhaps the best illustration is to show a familiar object at three different focal distances with different combinations of tubes.

Here is what the 50 mm can do at its closest focusing distance on a cropped-frame camera:

IMG_4874

with just 12 mm of extension, here is the same subject:

IMG_4875

And with all 65 mm of extension tubes added, we can get really close:

50 mm with 65 mm extension tubes

Clearly, there is a great difference in close focusing ability with the tubes mounted. Also, I used an American penny as we just got rid of ours.

When you buy extension tubes, they often come in a set of three. mine had 13, 21, and 31 mm tubes, for a combined total of 65 mm.

IMG_4860

As you can see in the photo above, the tubes have contacts to command the lens’ focus and aperture from the camera. While these that I bought some years ago are often the cheapest of the products available (about 50 bucks a set), I recommend buying the more expensive Kenko branded ones (maybe 170 if you shop around?). My old tubes are mostly plastic, and the mount pieces are starting to wear and break. Kenko tubes have metal mounts and thus should last much longer. Sometimes being a cheapskate doesn’t pay off! That being said, if all you will mount will be the 50, the plastic tubes should last a good long time. With heavier lenses, there is bound to be more strain on the mounts.

With 65 mm of extension on a 50 mm lens, we can achieve slightly better than 1:1 magnification. This means that we can fill the frame left to right with a subject measuring 22 mm on a crop frame camera. This is pretty darn good for most insect work.

Where extension tubes get difficult is that to achieve different magnifications, one has to keep swapping them out and re-combining them. While all this fiddling is going on, your subject may be some distance away! Also, while the tubes are mounted, you have only a narrow Goldilocks zone of focus, and you cannot focus to infinity. If you were crouched down shooting a butterfly and Bigfoot walked by, you might miss the shot, while your buddy with the compact camera and the quick-dismounting Raynox DCR 250 would nail it!

Nonetheless, this is a great method for getting into macro and closeup photography.

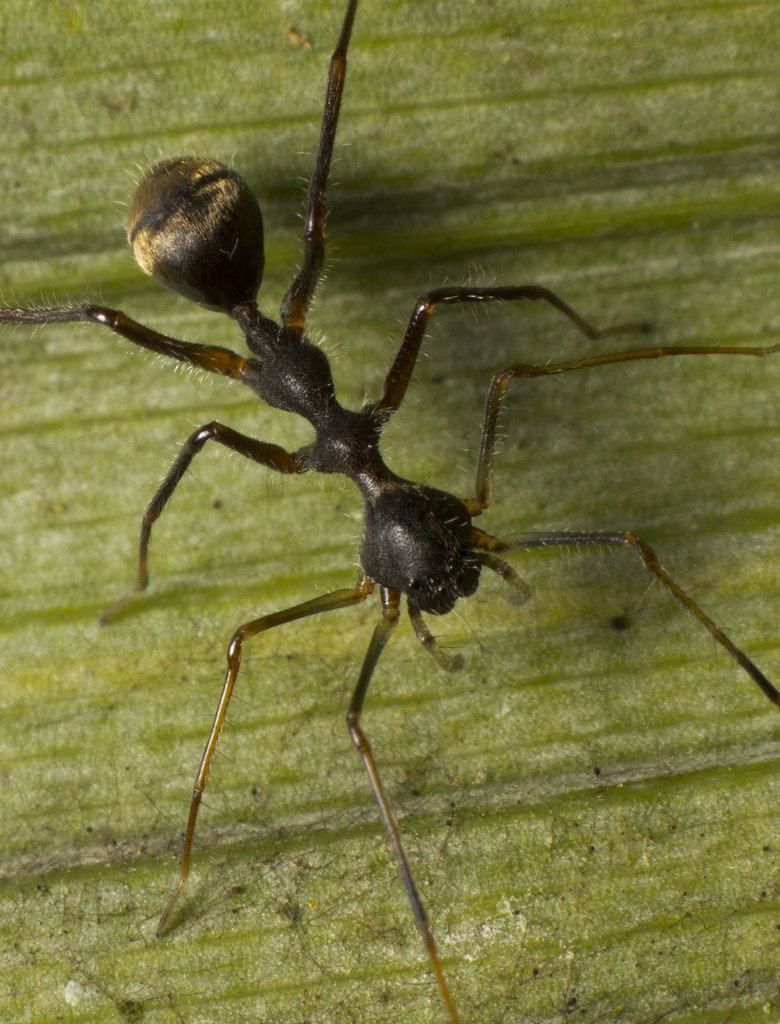
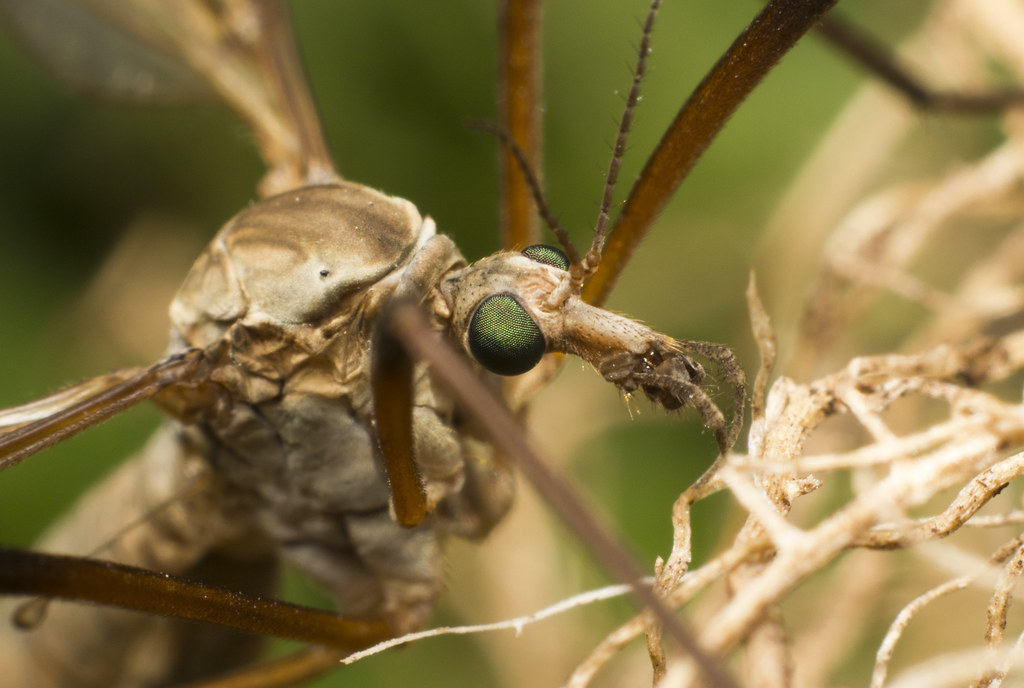
So what kind of real-world results can be achieved?

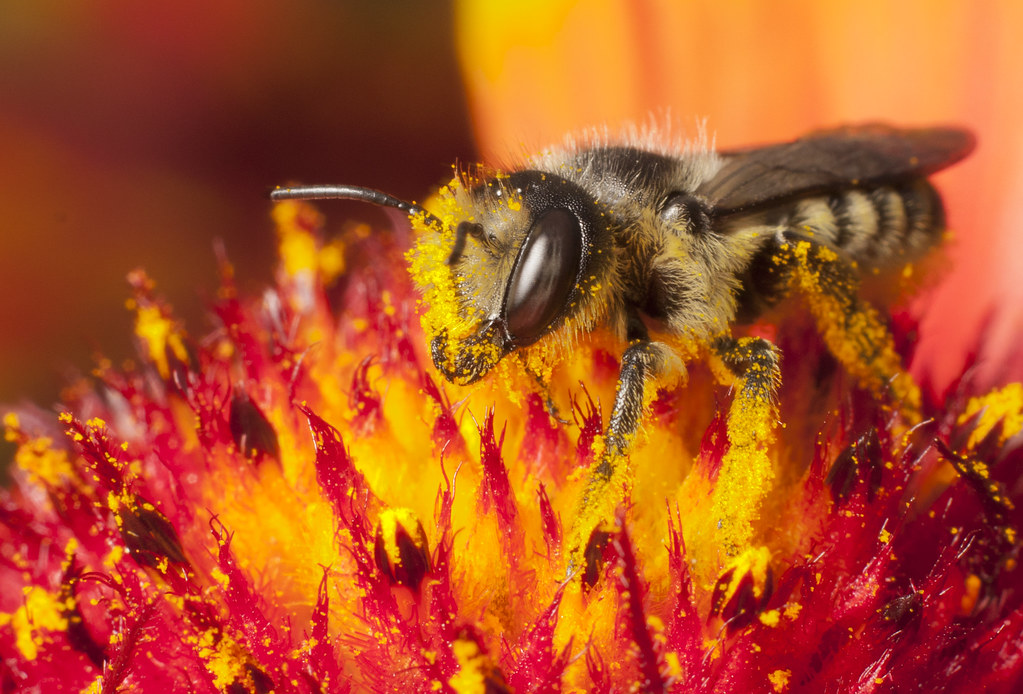
This megachilid bee, photographed at Iona Beach, is brought in very close with the 50 mm on 34 mm of extension tubes.

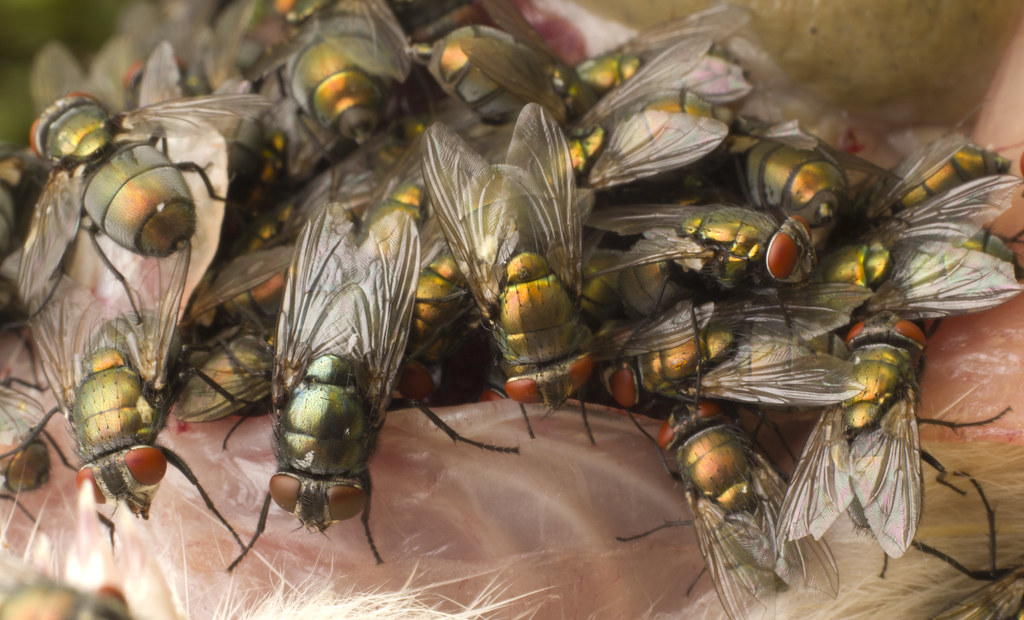
A group of Lucilia sericata and a lone Phormia regina feed on the abdominal cavity of a dead rat. This shot used the 50 mm on just 13 mm of extension.

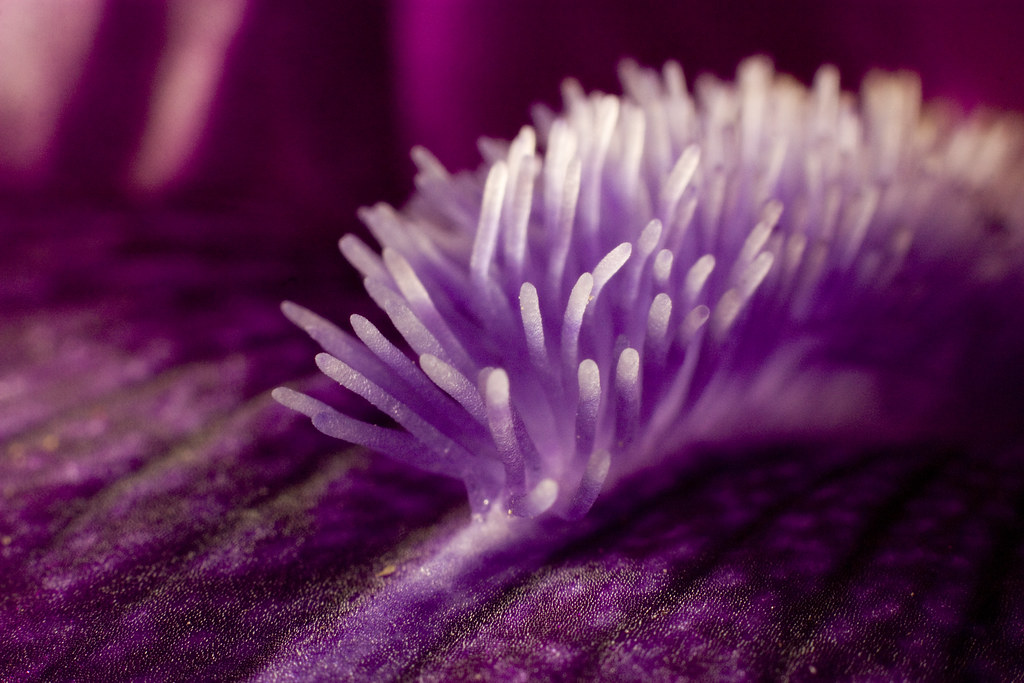
This detail of an Iris almost makes it appear to be a sea creature…Thanks, extension tubes!

To get this Rhododendron Leafhopper (Graphocephala fennahi)to fill the frame, all 66 mm of tubes were used.

Provided your subject is still, getting in close is not a problem.

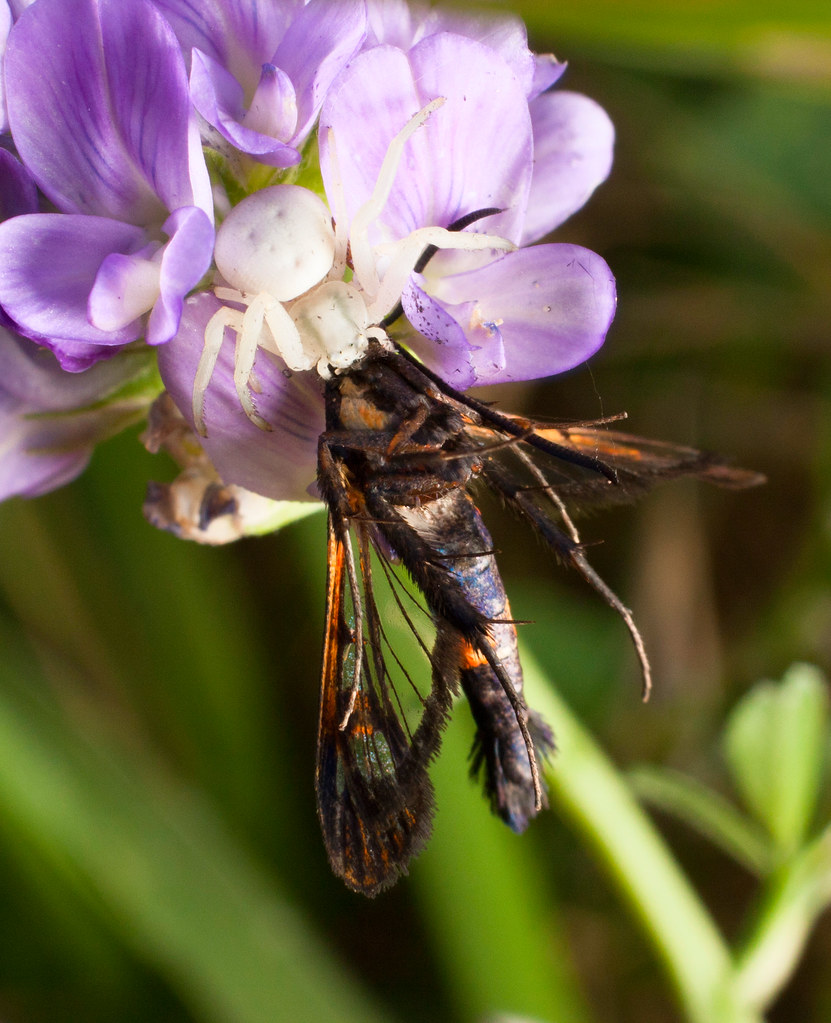
The modest 21 mm of extension brought this life and death drama of the crab spider and the Apple Clearwing into focus.

Extension tubes can also be used with shorter lenses, but get much past 35 mm and the working distance is going to be very tight and possibly unworkable. With longer lenses, the magnification gains are more modest, but sometimes the shortened working distance can be useful. I also get nice results with the 300 mm f4 and tubes, but I will wait til spring has sprung and I shoot some more material before I post about that.

Anyway, I hope that I have been a good advocate for the use of tubes and cheap 50s to get in close. If you cannot afford a macro lens, but would like to make some nice closeups, this will get you started and keep you happy for a good long while.

Weekend Expedition 5: Iona Beach with Wild Research

IMG_4575-2

A beautiful springlike day was a great change from the last Wild Research fieldtrip. Wow. The spiders were crawling, the birds were singing, the frogs were calling and there were warblers and ladybirds, caterpillars and flies.

This bird ID fieldtrip didn’t provide a plethora of species, but it was a very pleasant outing nonetheless. I definitely need to get back for some early insect photos if we get another nice day like that.

Please see below a gallery of images obtained on the weekend expedition to Iona Beach.

Weekend Expedition Plans: Iona Beach With Wild Research

It is time for another outing with Wild Research, this time to Iona Beach, another great wintering bird location. Iona Beach is located just to the North of Vancouver International Airport, and offers several habitats, including freshwater and brackish marshes, ponds, beaches, dunes and tidal riverbanks. I will be out snapping shots of the birders and the birds, hopefully with some nice light!

Crow Portraits

I think this is my most popular crow picture. I have shot hundreds of others, but this one particular inclination of the head seems to captivate people.

Many photographers struggle to find models, often paying lots of money to professional agencies or resorting to Model Mayhem to recruit on-camera talent. In Vancouver, I have found a huge selection of beautiful models who will work for peanuts. Literally.

One of my favorite activities in bird photography is to assemble a group of hungry crows in order to hone  my camera technique and practice my timing  Crows are photographically challenging due to their dark tones, but repeated efforts will yield nice results. These abundant city crows are used to scavenging human refuse and soliciting handouts, so feeding them does not risk altering their survival skillset.

They will approach closely, so shooting them with a 50 mm lens is definitely doable.

Contrasting the dark detailed plumage with saturated creamy backgrounds makes for a great portrait. Longer focal lengths are usually needed for this.

What I love especially about these birds is their curiosity and mannerisms that call to mind their intelligence.

In the Vancouver area, there is a high abundance of crows, who (when not rearing young) fly into the city at dawn from huge communal roost sites in Burnaby.

IMG_5512

These birds are headed from Coquitlam into Burnaby for the evening . The daily migration gathers birds from all around the area.

Because they are such willing subjects, I can experiment with different lighting styles, even overused hipster clichés.

lens flare and loss of contrast due to light source close to the subject. A no no or an interesting effect?

What I find most intriguing is how individual birds look so different from one another. In this shot, the preening crow looks almost raven-like.

I can show context or isolate. This was shot in Victoria in the spring, with blooming camas in a Garry Oak meadow.

One of the best things about working with an urban social species is that they go about most parts of their lives in front of humans, so they do not alter their behavior because of fear.  So I try to catch natural behavior as well, such as calling, anting, foraging,  playing, and allopreening.

During nesting season, the crows get a bit more reluctant to share their space with us.

Anting looks so satisfying! (it is likely to repel or kill ectoparasites)

Get your fresh water where you can.

Crow love. Allopreening (mutual grooming) is common in pair bonding birds. It probably arises in other situations also.

The red gape of this begging juvenile will disappear and become black like an adult. Also note the brownish tone of the juvenal countour feathers.

Another juvenile crow, this one learning how to forage on shellfish.

This was an attempt to shoot a “Meet Your Neighbours” style shot

Many many interesting moments can be had in rapid succession with a group of crows in attendance.

All in all, I think the crow makes a worthy model for future photographic study. I keep returning to them for inspiration and practice. There are so many more behaviors, looks and moods I would like to document. When nothing else is going well, a photo session with crows can always boost my morale and stir my imagination.
What kind of familiar subjects do you return to?

Go out and try some crow photography, or shoot whatever is your local equivalent. You may find that you return again and again for inspiration.